Pages

Saturday, July 8, 2017

Some Gd'A... and a Battle!

Been spending quite a bit of my free time reading and playing the new set of rules - by General de Brigade author, David Brown, General d'Armee. So far I am quite happy with them. They provide a nice level of tactical detail , while still allowing for a large, 'big division' type of battle.

The French - to the right - advance on the Russian positions.

Here are some of my favorite aspects to the new rules:
  • simple and fun command control through the use of ADC rolls - basically, a general rolls a d6 for every brigade to see how many ADCs are available to assign to tasks;
  • 'fatigue' based casualty system, divided into levels, with each level causing more degradation of a units effectiveness;
  • versatile basing system for any scale minis - there is no strict figure scale;
  • simple point system to help new players design scenarios;
  • battles feel right - like a proper Napoleonic battle.

The rules work great with my 10mm collection - a collection which is still in its early stages, and the GdB basing system I use works out perfectly. It should be noted that, although the rules have no strict basing or figure scale, the author does offer some suggestions - including using his preferred 1:20 figure scale and basing.

A bloody fire-fight between Saxons and Russians.


Anyway, I do hope to post more on these rules in the future. In fact, I am setting up another battle for the upcoming weekend - the Russians and French square off once again! I'll be sure to post more on this later on, including yet more of my observations regarding the rules.

Here are some pics of the set-up of the forces for this weekends battle:

A French brigade advancing on a lightly defended village.

Russian reinforcements on the way!

A small brigade of Russians holding the village.

The Saxon brigade - always popular in my battles.


Overall a great set of rules. However, I am still a rabid fan of GdB, and it will take quite a bit to shake me away from those rules. I can see myself playing with both sets for a while until I get a good feel for Gd'A. We shall see.

In other news, in case you have been living under a rock, I will be starting my newest project later this year: the 1813-14 campaigns in... 28mm scale!!! At the moment I am loving painting and collecting 28mm for the American War of Independence, so doing Napoleonics in that scale just seems... well... right. :) So, 28mm it is. Of course, I will be collecting and basing for use with the GdB rules.

Some of my AWI troops in action.


So there you go folks. Stay tuned for more updates as I find time - and have something interesting to post. See you all soon.

~K


Saturday, December 31, 2016

"Reload the Cannon!"


     Well, that was certainly a wild ride! 2016 is almost gone – imagine that. I have to admit, I certainly had some amazing battles, painted up some glorious miniatures, and read through quite a few rulebooks. Remember all those?!
One of many Blucher games I played.


     Some 2016 highlights:

·         painted aprox. one thousand 10mm Napoleonic figures;

·         researched many different uniforms, flags, and organization for French and Russian armies;

·         learned all about the 1812 French invasion of Russia;

·         and reviewed and played some fantastic Napoleonic’s rules:

o   General de Brigade;

o   Blucher;

o   March Attack;

o   Black Powder;

o   Drums & Shakos: Large Battles;

o   Sharp Practice II.

     Wow! That was quite a journey. I have to say, it was a wonderful ride. All those BatReps I had fun playing and making in to videos. Also had some of the best LIVE Plays I have ever had over on the Tabletop Commanders community – that last one was amazing fun.
Some GdB action.


     I have to wonder though, is that it? Wargaming is what it is… a hobby. Am I done with this little journey of mine? No way!!!

     So what is next in 2017?

·         Expand my collection of models – 10mm, of course – to account for the 1813-14 campaigns,

·         expand my French army to include more allies – Saxon grenadiers and cavalry, Poles, and Swiss,

·         try out some newrules sets, such as ESR,

·         explore collecting for navel battles of the era – 1:1200 scale,

·         get a start on collecting 28mm scale troops for smaller, skirmish-level, games.

     Not bad, eh? You didn’t think I would say, “Oh… that was fun. Now I will set it all aside for something else new and shiny!” Not a chance!
Test-trays for use with future Blucher games I am currently working on.


     To be quite frank with you, I have truly fell in love with this era. The thoughts of researching the era, collecting Napoleonic miniatures, and recreating the great battles of the black powder era just draw me like no other era has. I am not just looking forward to 2017, but the many, many years ahead in my hobby-life. Of course, plans can quite certainly alter over the course of 2017. As always, time will remain an issue for me. Embarking on a writing career early in 2017 will demand much of my free time. However, this hobby - Napoleonic miniature wargaming - will always remain an important part of my life. We shall see how well it all blends together in the coming months and years. Onwards, as I like to say.
Saxons and French assault! A wonderful game using the March Attack rules I tested earlier in 2016.


     There you go. My reflections, and my plans, have been revealed. I hope you have some fun plans brewing in your head too. Hopefully, this infrequent blog will continue to both provide some inspiration for you – the reader, and log my own progress as I travel down this long and fascinating “Napoleonic” path – some would call this a never-ending pit!

     Till next year…


~K

Monday, September 5, 2016

Defense in Depth - Testing L'Art de la Guerre

       So, how effective was Roman deployment in multiple lines anyway? Or, more specifically, how well does deploying in depth work using the L'Art de la Guerre rules?

Both armies are deployed! The Romans have a very narrow front, depending on their cavalry to protect the flanks.

       During the Roman republic it was quite a common for Roman armies to deploy in multiple lines - in this case three.
  • The first line was made up of the less well armored hastati.
  • The second line was made up of legionaries with a tad better armored - chain shirts in this case, called principe.
  • The third and final line was made up of not only the best armored troops, but the most veteran - the triari.
One might also count the velites - light skirmish infantry - as a separate line as well, being well positioned ahead of the army ready to pitch their javelins at the advancing enemy.

The Gauls were a good mix of warriors on foot and on horseback.

       Curious as I am, I wanted to see how well my favorite ancient rules hold up using a deployment such as this. I saw right away I would have to make some adjustments to the rules, although minor. For one, I would not be using the standard rules for deploying armies in left, right, and center corps. I would still divide the army in to three corps, just not being so strict as to where each was deployed. In addition, since I would be using only two legions, I decided that each legion would be a separate corps. The third and final corps would be the armies general, consisting of only the two units of triari. These would be positioned in the third line and in the center. Each of the remaining two legions would deploy on the right and left and would both be deployed in two separate lines, representing the first/hastate line, and the second/principe line Each of these two legions also included some non-legionare troops in the form of cavalry - both Roman and Numidian. Each legion also had a couple of units of velites. These were deployed ahead of the hastate/first line. In addition, to avoid front units routing and causing cohesion hits on rear friendlies, I left gaps between each line of just over 1UD each.

       The Gaul army had a nice mix of med. and hvy. infantry which were impetuous. They also have a good number of cavalry on both flanks - more than enough to handle the meager Roman cavalry.


As the attacker in this scenario, the Gaul army surges forward on all fronts, quickly engaging the flanks of the Romans
       Right from the beginning I knew that I would have issues protecting the Roman flanks, preventing an envelopment of the legions - thoughts of Zama spring to mind here. However, I decided to carry on with the battle.


As the Roman flanks are engaged, the initial wave of Gaul warriors crashes in to the Roman defenders. This first wave was made of the med. infantry. Also note the intense and close run cavalry fight on the Roman left. The Numidians went toe-to-toe with the Gaul cavalry here for some time during the battle.

Although the Roman right flank was defeated in detail, the first Roman line remained intact after losing a unit and receiving heavy losses. I knew at this point that I would have to commit some rear line troops to defend that right flank. Not exactly what I wanted to do.

It was obvious to me that the flanks would play a huge role in the battle's outcome. Of course, this is not unlike what occurred historically in many battles.

The Gaul left penetrates deep on the flank of the Romans, pushing back the velites, forcing a unit of triari to commit. Also note the first line of Romans has weathered the initial assault and

At this point, with no on-board camp to worry about, I considered going on the offensive with the legions in order to hasten the fight in the center. However, since this was more of a test to see the value of the defense in depth, I chose to stay back and see how effective the rear ranks would be in defending against flank attacks.

As the main Gaul infantry approach, the rear ranks become more and more engaged as the Gaul cavalry defeat the Roman left wing as well! Both triari have been committed, as well as the second line. Not what I expected.

At this point in the battle the fighting was all over the place. The first Roman line, although battered initially, still was intact. The rear lines were all but fully engaged and committed to the fight on the wings.

The battle was pretty much over at this point, with the Gauls withdrawing from exhaustion. The Roman first line is once again assaulted - this time by the more worthy heavy Gaul infantry.

The Romans are engaged on all fronts! There is no doubt that the Romans at this point were in trouble. However, being less resilient than their opponents, the Gaul forces initial impetuousness was spent. It was only a matter of time before they would fatigue and withdraw from the fight.

       The battle was over. It should be noted that I kept playing the fight longer than I should have. The Gaul army was defeated a tad earlier, but I kept the game up regardless. Even so, it was a close fight for both sides.

       Although the test didn't go the direction I wanted - testing out the defense in depth against a frontal assault, it did show how effective the deployment was at protecting against flank attacks. The Romans were able to shift forces relatively quickly against the less able Gaul cavalry, dealing with them quite effectively.

       Realistically, having a much smaller frontage, the Romans would often deploy rear ranks to extend the front. Optionally, the flanks could have had more troops as well.

       Overall, it was a fun battle. Exciting throughout - as the L'Art de la Guerre rules tend to be, I enjoyed every bit of the fight. Although not having been able to test out the durability of the three lines against heavy frontal assaults - at least in the manner I planned, I did learn a lot about the effectiveness of the system to adapt as needed. I also learned the vulnerability of the flanks! Again, I kept thinking Zama as the flanks each crumbled.
http://www.artdelaguerre.fr/en/index.php?lang=en&PHPSESSID=2ab3235fd56c9c9241a791617fc30a4c
      
       I hope you enjoyed the article. I hope to have another like this soon. In fact, I am already planning some scenario type battles for use with L'Art. More on these in the coming months.

Until next time...

~K


Friday, September 2, 2016

Rome v. Gaul: L'Art Action Online!

       Last week I saw myself fully engaged in running a fantastic game of L'Art de la Guerre for some of the members of the TtC community. This was basically a two player game, although several different players took command as the battle raged. I myself also took command of one side to fill in for a missing player. Was a really enjoyable battle that really brought out the best in the L'Art rules.

The rushof the Gauls on the Roman battle line.

       This was a 200 point battle featuring the Republican Romans against a Gaul army. The battle lasted a total of nine turns and saw the Roman army under the command of David Nickols pull off a close contested win - Gaul exceeded their break point by four points.

The Gaul army quickly defeated the Roman elephant and gained control of the Roman right wing.

       I really enjoy the L'Art rules system. It seems a perfect blend of some other well known and popular sets of rules, such as DBx, FoG, and Impetvs. Not only that, it allows for small armies for the beginner, as well as larger battles on a typical 6' x 4' table, or larger. These rules have really caught my attention and I am pretty sure they have now become my "go-to" rules for ancients gaming, along side DBA and Impetvs. I still need to try the Hail Caesar rules, however.

Some things I really enjoy about the L'Art rules:

  • foot elements - called 'units' in L'Art - look more impressive, being 2-3 bases deep;
  • allows for small DBA-like armies, as well as bigger armies;
  • lots and lots of army list included in the rules;
  • analytical rules without being overly complex;
  • similar feel to both DBx and Impetvs;
  • feels like an ancients battle!

These Numidians would be soon driven from the field.
       Of course, the rules are not perfect. I always liked unit reactions to combat, such as push-backs, recoils and retreats. L'Art has none of that - it does allow some limited disengaging from melee, however. The rules themselves could have been better organized and written in some respects. It can be a chore remembering some of the more fiddly things. All minor complaints really.

We used these markers spread between the various commands as a visual aide for players.

Late in the fight. You can see the Romans have completely defeated the Gaul right, and Gaul has all but broken through the Roamn right!

The Romans cleaning up the Gaul right flank.

Very early on the Gauls were very aggressive and launched head-long into the Roman lines.

A close up of the Gaul troops breaking through the Roman right. All that remains is a lone Creten unit.

Last turn of the fight! Rome wins!
        With the battle over, I have now moved on to another scenario - a SOLO affair. Perhaps I will post this one later. I will be pitting my Republican Romans against the horde of Gaul once again, this time using some historical deployments to see how the Romans fair. Stay tuned.

Until next time...

~K


Friday, July 29, 2016

Narrative and Team Yankee


One thing I really enjoy about Flames of War is how dependent on the narrative of WW II history it is. To be honest, the narrative is what it's all about for me - as far as playing a game anyway. I crave a good back story and purpose to my battles. Having the entire history of WW II as your backdrop makes the FoW rules really shine for me. However, when it came to the cold war era of the 1980's I definitely had some reservations. For one, open war never happened! This dance with the hypothetical was something new to me in wargaming - at least in terms of known history. It was in fact something more along the lines of a hard sci-fi type of background. Anyway, I decided some time ago to give it a shot, fan that I am of FoW.

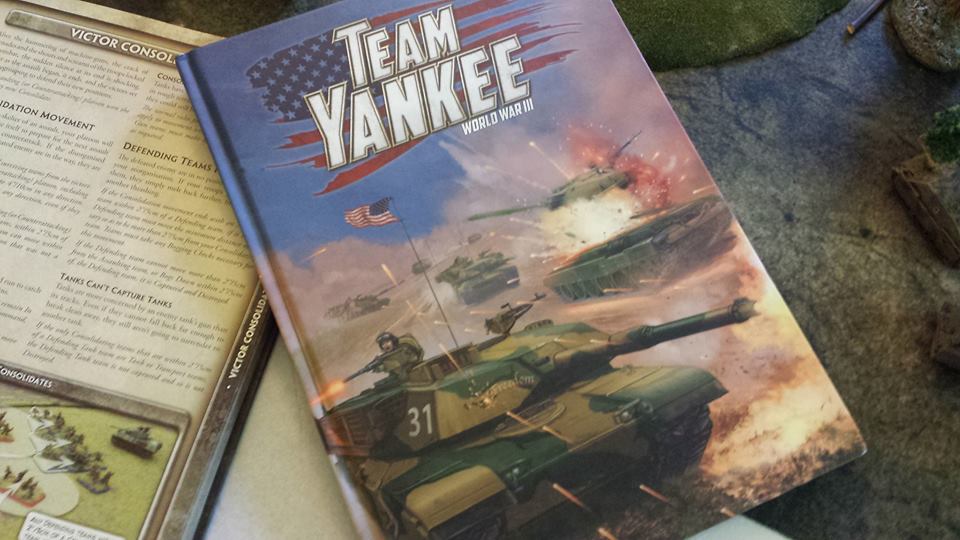
The new rulebook is really high quality - to be expected from Battlefront. Although
smaller in dimensions to the core FoW rules for WW II, this baby packs a lot of detail!
Boy was I surprised when I got the Team Yankee rulebook today. After a quick read - focusing on the initial pages covering the history and background of the conflict, I was drawn in to the story big time! Take note that I have never read the Team Yankee novel itself, so I am pretty much restricted at the moment to the information provided for Battlefronts rules themselves. Regardless, after a read all I can say is I am hooked! In fact, I have decided that I need to get a copy of the Team Yankee novel ASAP! Of course, marketing is what it is, and I am sure all those concerned with the sale of this product will be pleased. However, all I can say is that it is worth it. That narrative and back story is exactly what I was hoping for with this new set of rules in the FoW family.


Anyway, as I peer through my new and shiny rulebook with a giant smile running across my face, I realize that I haven't been this excited since I first got back in to the hobby four years ago. How amazing is that?! With such a fascinating background how could I resist playing this with my favorite set of rules. Again, backstory and narrative is everything to me. Flames of War offers much regarding that, for me anyway. The game play is almost always full of drama and story. Of course, not everyone can see it, perhaps too caught up in the game-play itself. But for me, I like to hang back a bit, take my time, and absorb it. That is my play-style.

I hope to get more stuff up on this soon. I already have my tokens all bought, and the Leopard book on its way - I am going for the West Germans and Russians initially. After a good read of the Leopard book I will be buying my actual units. So stay tuned folks, good things come!

Until next time,

~K