 |
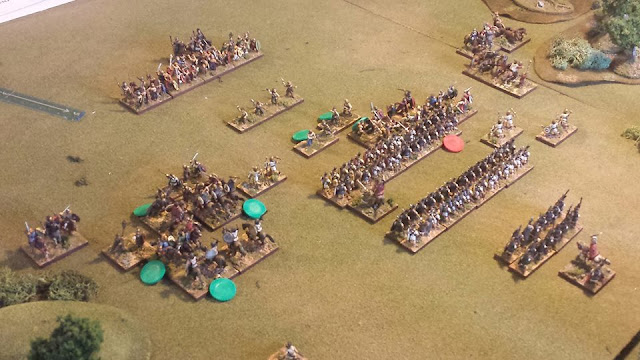
| Both armies are deployed! The Romans have a very narrow front, depending on their cavalry to protect the flanks. |
During the Roman republic it was quite a common for Roman armies to deploy in multiple lines - in this case three.
- The first line was made up of the less well armored hastati.
- The second line was made up of legionaries with a tad better armored - chain shirts in this case, called principe.
- The third and final line was made up of not only the best armored troops, but the most veteran - the triari.
One might also count the velites - light skirmish infantry - as a separate line as well, being well positioned ahead of the army ready to pitch their javelins at the advancing enemy.
 |
| The Gauls were a good mix of warriors on foot and on horseback. |
The Gaul army had a nice mix of med. and hvy. infantry which were impetuous. They also have a good number of cavalry on both flanks - more than enough to handle the meager Roman cavalry.
 |
| As the attacker in this scenario, the Gaul army surges forward on all fronts, quickly engaging the flanks of the Romans |
Right from the beginning I knew that I would have issues protecting the Roman flanks, preventing an envelopment of the legions - thoughts of Zama spring to mind here. However, I decided to carry on with the battle.
 |
| It was obvious to me that the flanks would play a huge role in the battle's outcome. Of course, this is not unlike what occurred historically in many battles. |
 |
| The Gaul left penetrates deep on the flank of the Romans, pushing back the velites, forcing a unit of triari to commit. Also note the first line of Romans has weathered the initial assault and |
 |
| The battle was pretty much over at this point, with the Gauls withdrawing from exhaustion. The Roman first line is once again assaulted - this time by the more worthy heavy Gaul infantry. |
The battle was over. It should be noted that I kept playing the fight longer than I should have. The Gaul army was defeated a tad earlier, but I kept the game up regardless. Even so, it was a close fight for both sides.
Although the test didn't go the direction I wanted - testing out the defense in depth against a frontal assault, it did show how effective the deployment was at protecting against flank attacks. The Romans were able to shift forces relatively quickly against the less able Gaul cavalry, dealing with them quite effectively.
Realistically, having a much smaller frontage, the Romans would often deploy rear ranks to extend the front. Optionally, the flanks could have had more troops as well.
I hope you enjoyed the article. I hope to have another like this soon. In fact, I am already planning some scenario type battles for use with L'Art. More on these in the coming months.
Until next time...
~K
Although the test didn't go the direction I wanted - testing out the defense in depth against a frontal assault, it did show how effective the deployment was at protecting against flank attacks. The Romans were able to shift forces relatively quickly against the less able Gaul cavalry, dealing with them quite effectively.
Realistically, having a much smaller frontage, the Romans would often deploy rear ranks to extend the front. Optionally, the flanks could have had more troops as well.
Overall, it was a fun battle. Exciting throughout - as the L'Art de la Guerre rules tend to be, I enjoyed every bit of the fight. Although not having been able to test out the durability of the three lines against heavy frontal assaults - at least in the manner I planned, I did learn a lot about the effectiveness of the system to adapt as needed. I also learned the vulnerability of the flanks! Again, I kept thinking Zama as the flanks each crumbled.
I hope you enjoyed the article. I hope to have another like this soon. In fact, I am already planning some scenario type battles for use with L'Art. More on these in the coming months.
Until next time...
~K


Great article and betrep buddy, that is what testing is all about, things don't happen as you had planned, so a really good test of the rules.
ReplyDeleteThanks Ian.
DeleteThank you. Nice experiment. I had thought about this as well as I was going to start using a Roman army.
ReplyDeleteThank you Phil. I have some more tests to run, trying different historical tactics/deployments. Good luck on your project.
Delete~K
Great photos and AAR! I have built some of my ADLG armies with a cavalry or elite infantry reserve in mind. Shortening your main battleline is acceptable so long as you can deploy a reaction force to shore up your flanks or exploit a breach in the enemy's battleline. Flexibility can be decisive. Thanks.
ReplyDelete